This is the first post by contributor Amanda Webb. If you would like to contribute to Ignite Visibility, apply here.
It was October 2008 that I set up my first Facebook business page. They were called fan pages back then and marketing seemed so easy.
Today Facebook has changed beyond recognition. Marketing has become harder, new features have appeared and disappeared and competition your target market’s attention has become much more intense.
But it doesn’t mean you should throw in the towel with your Facebook business page. I’m going to share with you some hidden features you may have missed and some tips and hacks that should make your Facebook marketing easier.
Messaging
Facebook continues to offer more and more functionality of its messaging features. Use these features to your advantage for great customer service.
1. Set Your Own Response Time
Facebook recently started telling people how long it took us to respond to direct messages. At first I was annoyed that it chose to tell people that I respond within ‘a few hours.’
Then I realized there was a strong advantage in setting expectations.
If users see it will be a few hours before they hear from me they won’t be hanging around in anticipation. Facebook sets this automatically but you can override it and set your own time limit.
Why Change Your Response Time?
Sometimes this automatic averaging can misrepresent you. For example, I recently got a friend to send me a photo via my Facebook page. I didn’t reply to the message immediately so my automatic response time went from ‘a few minutes’ to ‘a few hours’. I can now override the automatic feature and reset my response time to minutes.
You may also want to change your response time if you know you are going to have limited Internet access. Switching your response time to ‘within a day’ ensures your customers will know not to hang around for your usual quick response.
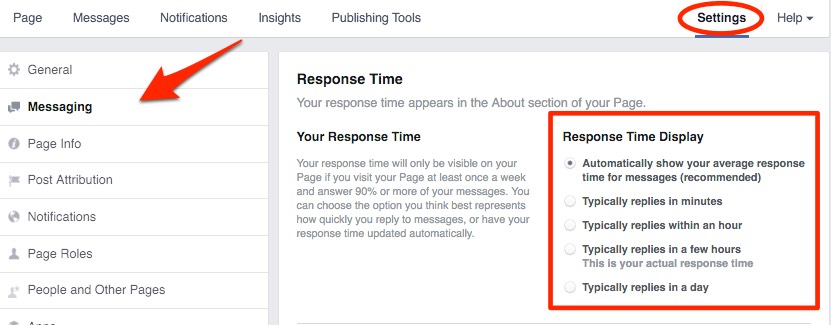
Here’s how to set your own response time:
- Click ‘Settings’ at the top right of the page
- Select ‘Messaging’ from the left hand side bar
- Select your own response time from here
Choose from:
- Automatically select your average response time for messages
- Typically replies in minutes
- Typically replies within an hour
- Typically replies in a few hours
- Typically replies in a day
2. Create Instant Replies to your Page’s Messages
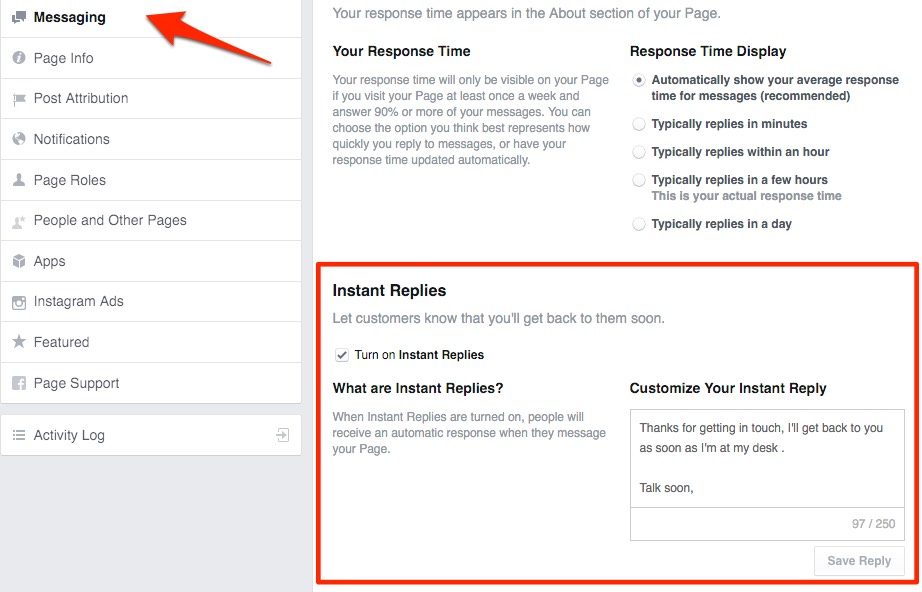
If you aren’t able to respond to page messages quickly it’s worth allowing ‘Instant replies’.
Facebook gives you 250 characters to write a customized response that will be sent immediately to messages.
In mine I thank them for getting in touch, let them know when they can expect a response, and sign off with my name.
You’ll find Instant Replies underneath ‘Response Time’ in your Facebook messaging settings.
3. Save Time with Canned Responses
If you get a lot of inquires via your Facebook page, you can set up some prewritten responses. This is useful if you find yourself writing the same replies over and over again.
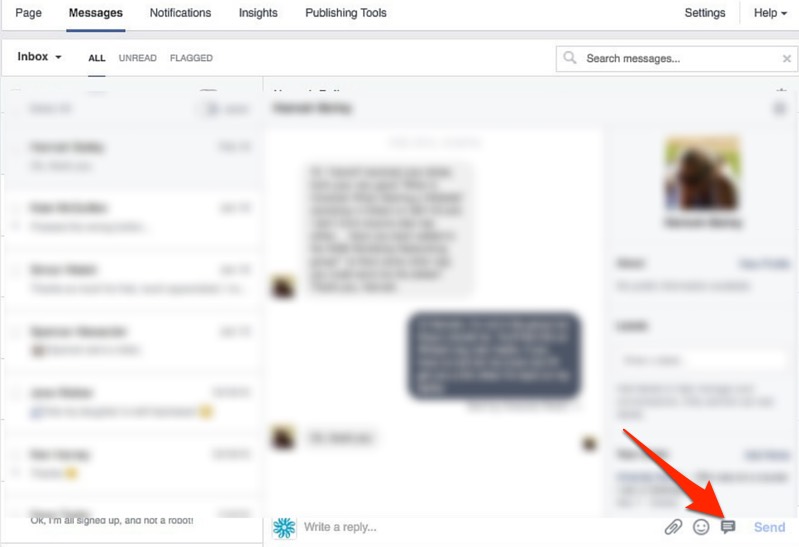
Here’s how to set them up:
- Click ‘Messages’ at the top of your Facebook page
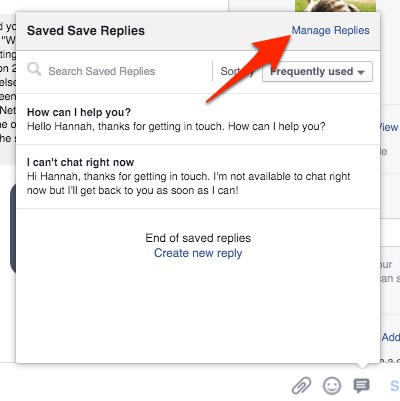
- Click the speech bubble at the bottom right hand side of the page (underneath the most recent message)
Facebook has set some suggested responses for you. Click one of these to send it to the selected user or set up standard responses for future use.
Here’s how:
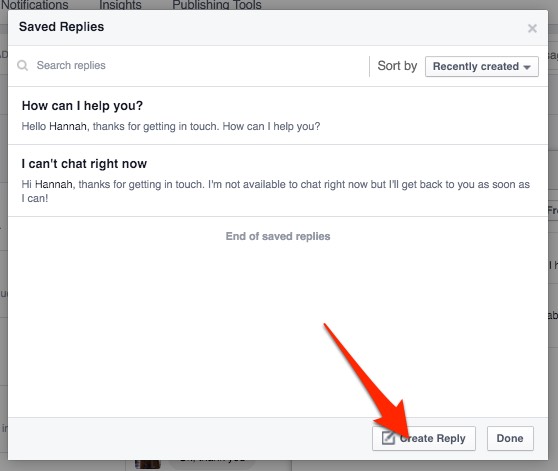
- Click ‘manage replies’
- Then ‘create new reply’
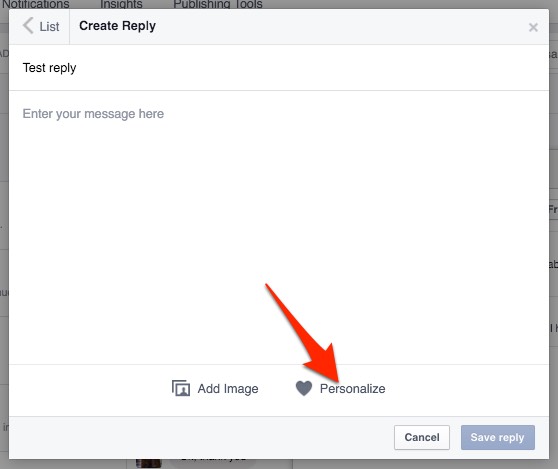
- Give your reply a name and compose it in the box below
- Click the heart at the bottom of the window to personalize your message. You can to personalize your message with:
- Person’s first name
- Person’s last name
- Admin’s first name
- Admin’s last name
- Your website URL
- Your phone number
- Your address
Note that Facebook will populate this information directly from your page info so make sure your phone number and address are up to date.
4. Send an Automated Out of Office Message
At the top of the “Messages’ panel is a button that when clicked, will mark you as out of the office for a maximum of 12 hours. This is really useful if like me you go to a lot of meetings or are out of the office for prolonged periods of time.
Messages unanswered while in ‘away’ mode don’t count towards your average response rate score.
Page Settings
Photo tagging and organic targeting are two pro features that are sadly underused by many marketers. Let me give you some neat suggestions that perhaps will change that trend.
5. Switch on Photo Tagging
When you tag someone in a photo or video on your personal profile, they get a notification that they have been tagged and some of their friends will see that post in their newsfeed.
If you are a business that shares a lot of people’s photos, you will know that you can only tag people you are friends with.
How can you get other people to tag photos?
- Let people know when you take the photos that you will be sharing them on Facebook so they can tag themselves.
- When you post the photo, tell them to tag themselves
- Make sure you have enabled tagging on your page.
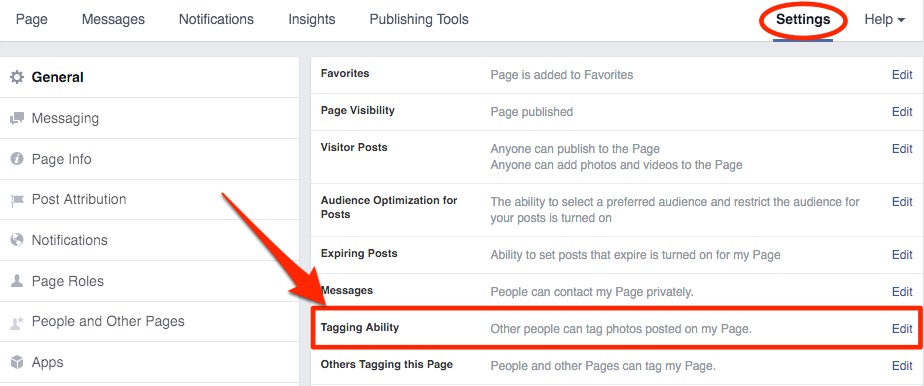
Here’s how to enable tagging:
- From your Facebook business page click ‘Settings’
- Click ‘Edit’ next to ‘Tagging Ability’ and switch it on
6. Target Your Organic Posts
We talk about the power of targeting for Facebook advertising a lot — but did you know you can also target organic posts? This is particularly useful if you have very distinct segments of customers.
For example, if you are a hotel you will most likely target brides, business travellers, event managers and tourists. As you must know, these groups of customers have very little in common. By using targeting organic posts, you avoid sending all these groups too much off-topic content.
Note: Posts will still appear on your Timeline but won’t get organic distribution beyond the people you target.
Here’s how:
- From your ‘Settings’ menu switch on ‘Audience Optimisation for posts’
- Write your post
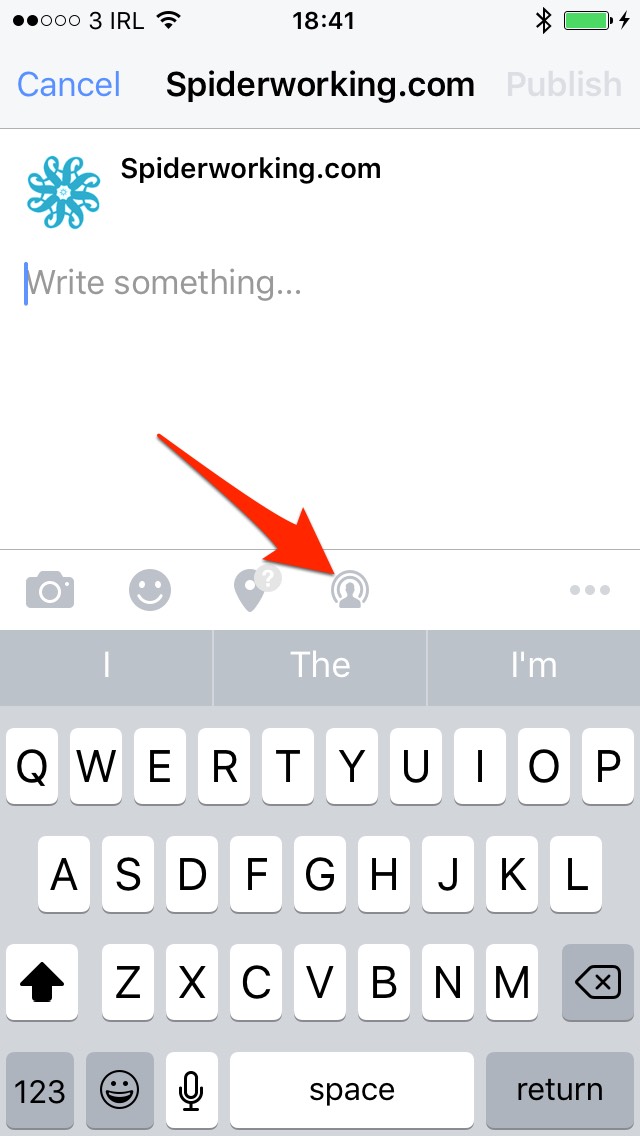
- Click the crosshair icon underneath the post
- Select your audience by interest, location, gender age or language
Here’s a short video that shows you how it works:
7. Experiment with Facebook Live Streaming Video
With Facebook Live, you can livestream a video broadcast directly from your phone to your Facebook page. And it’s getting great organic reach numbers.
I ran a test last week and although only 5 people watched live the reach continued to grow long after the broadcast. I’m planning a weekly show as a result.
To broadcast on Facebook Live:
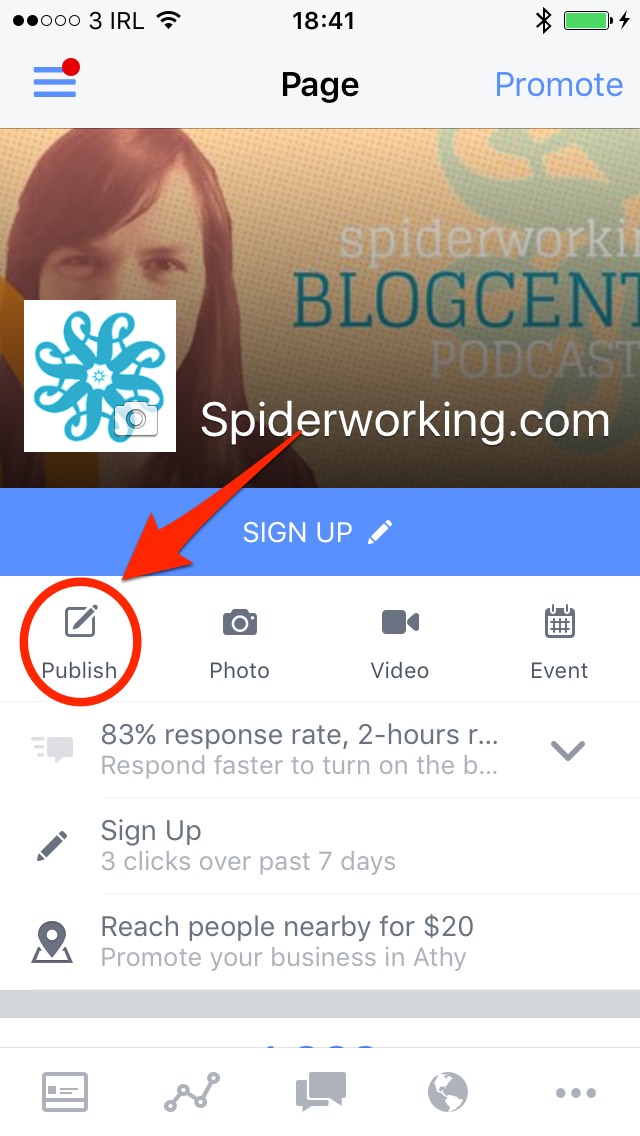
You will need to be using the ‘Pages Manager’ app on an iPhone
- Click on ‘Publish’
- Click the icon of a person with circles around
Currently Facebook Live is only available to iOS users but it’s being rolled out for Android.
8. Schedule Shared Posts from Other Pages
Facebook likes it when we share posts from other pages. As such, it gives these shares good organic reach.
There is one problem with this. Using the traditional share button doesn’t allow us to schedule these posts. There is a way around this.
Here it is:
- Find a post you want to share.
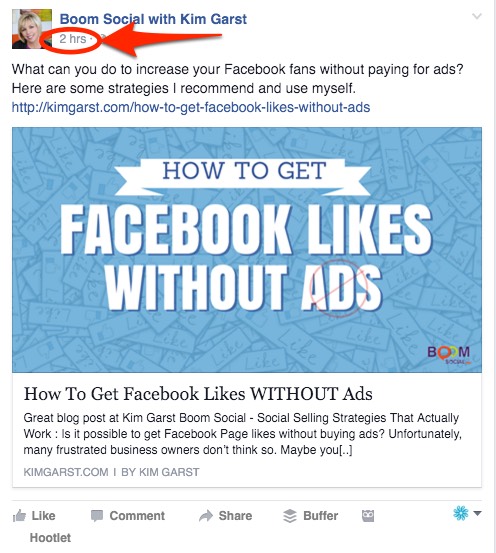
- Click on the timestamp of the post. That’s the bit that tells you when it was posted. In the example below you can see it is ‘2 hours’
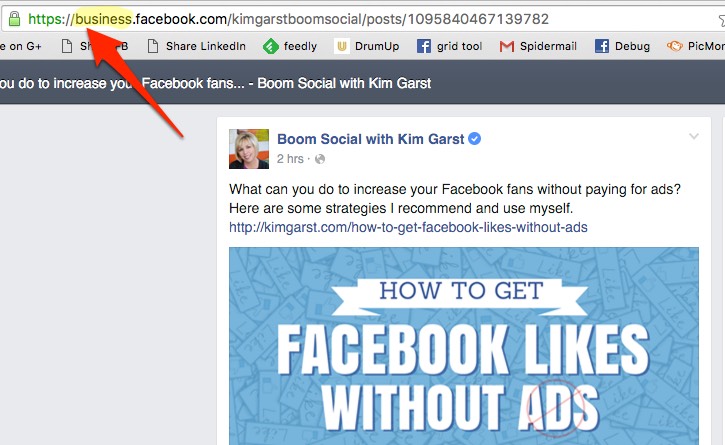
- This opens the post in its own page. Copy the link in the address bar at the top of the page
- If you are using Business Manager, you’ll need to edit that link slightly and get rid of the word ‘business’ from it. (see below)
Copy this link and schedule it as using Facebook scheduling as usual.
9. Invite People Who Interact with Your Posts to Like Your Page
One of the nice things about Facebook is that people will see your page posts even if they don’t like your page. When users comment or like on a post a portion of their friends will see it too. More of their friends will see it if your post gets shared.
When people interact with your post who don’t already like your page you can invite them. It’s a nice way to grow your page’s following with people who are already receptive to your Facebook posts. (And it’s of course infinitely cheaper than advertising – because it’s free.)
Before I show you how this works there are two things you need to know:
- When you send an invite, it will appear to come from you not your page
- Facebook doesn’t seem to recognize all the people who like your page. There are some users who I know like my page that Facebook still offers that I invite.
Here’s how to do it:
- Find a post on your Facebook page that has lots of likes or comments
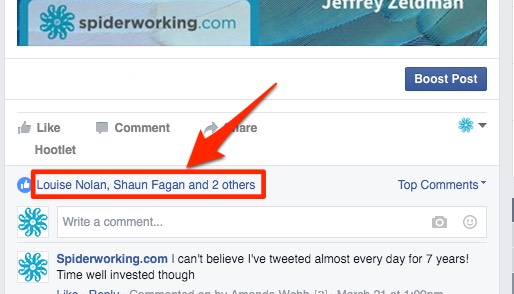
- Click on the list of names of people who Like the post
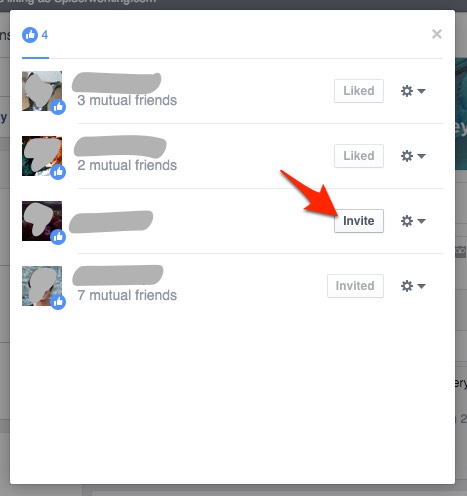
- Click the ‘invite’ button next to anyone who doesn’t already like your page
Monitoring
10. Catch Your Shared Posts with AgoraPulse
When someone shares your posts on their pages you want to know about it, right? Although Facebook sends notifications when people share our posts, they can be easy to miss, particularly if you manage a lot of pages or get a lot of interaction.
I was surprised to see that I had missed lots of shares of my content. It was only when I looked at my AgoraPulse monitoring that I discovered them. (For those uninitiated, Agorapulse is a social media dashboard for Facebook, Twitter, and Instagram.)
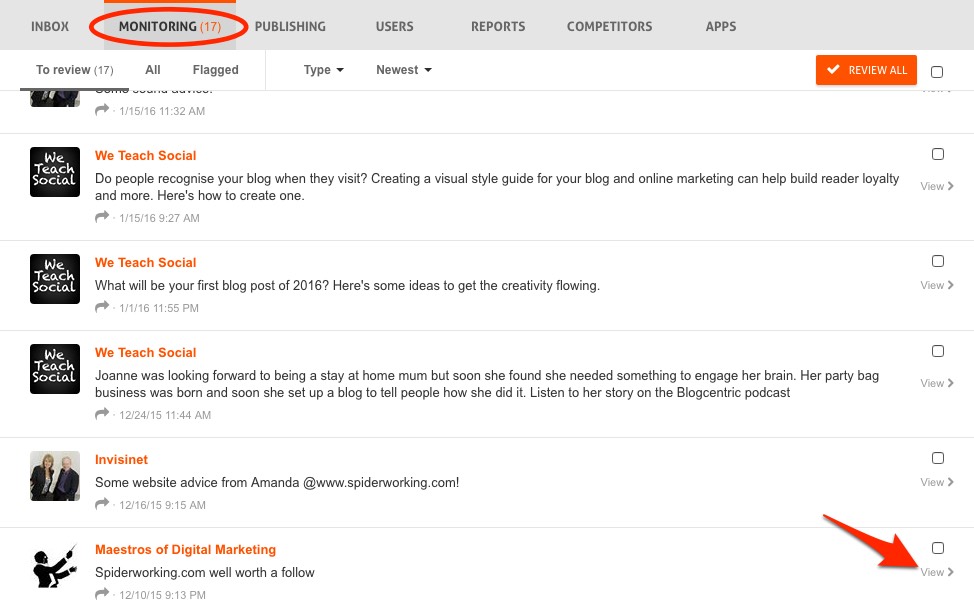
There is a specific tab on my AgoraPulse dashboard for ‘monitoring’ making it easy to keep an eye on shares and mentions.
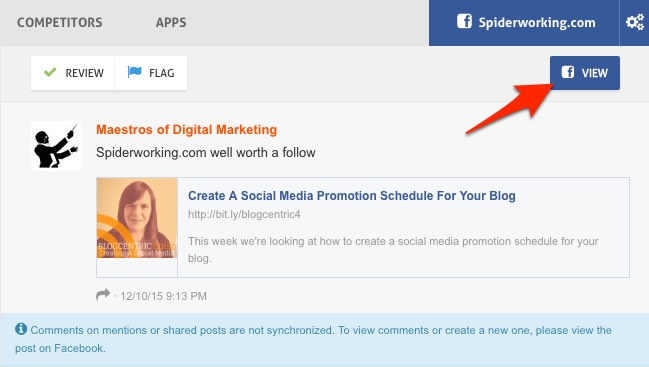
From this tab I can view the post and click through to Facebook and respond.
11. Control The Comments on Your Dark Posts
While I’m talking about AgoraPulse, another cool feature is the ability to monitor comments on ‘Dark Posts’. These are posts that you create in Ads Manager or Power Editor that are only used for advertising.
Yes, you get notifications about these posts on your Facebook page — but if you manage lots of advertising accounts and pages staying on top of these can be hard work.
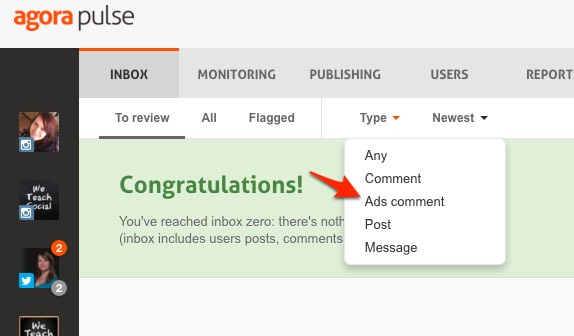
From the AgoraPulse dashboard select the page you want to monitor and click ‘Type’. Select ‘Ads comments’. You can respond to, flag and even delete spammy comments without having to leave AgoraPulse.
12. Monitor Your Organic Reach
It’s easy to get disheartened with Facebook marketing, particularly when you look underneath your latest post only to discover that Facebook has shown it to a tiny portion of your audience.
One way I keep an eye on reach is to monitor my weekly average organic reach. This refers to the average number of Facebook users that see each post you publish.
I started monitoring this statistic in December and I’ve actually seen a significant increase in reach even though some of my posts are reaching fewer than 100 people.
To find your average organic reach:
- Select ‘Reach’ on the left hand side of your Insights page
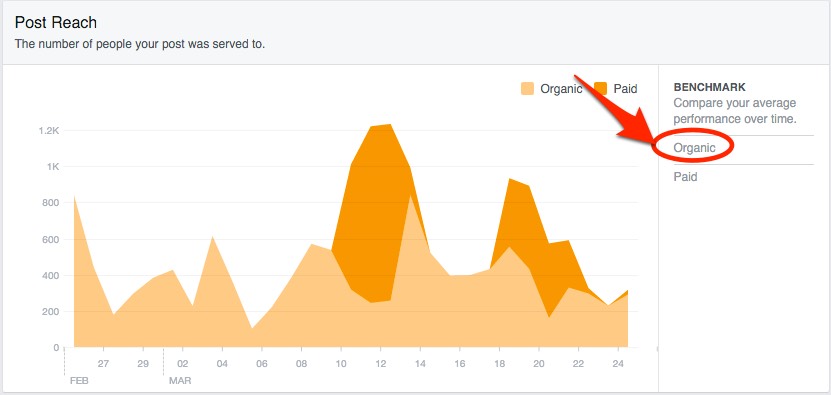
- Click ‘Organic’ under the benchmarking menu
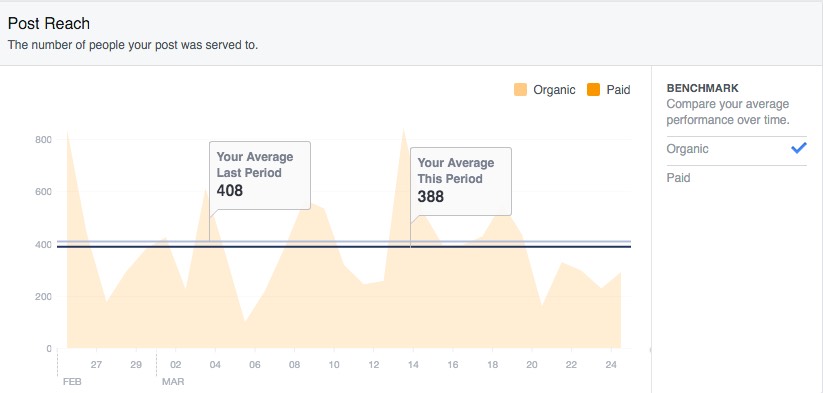
- Now you can see your current average reach for the last 30 days in comparison to the reach for the previous period.
I keep a spreadsheet with this and other stats that I update every Tuesday so that I can monitor any fluctuations.
These are just a few tips and features for your Facebook page. Are there any you rely on? Are there any great Facebook hacks I’ve missed? If so I’d love to hear about them in the comments section.
About the Author
Amanda Webb is a social media speaker, trainer, consultant, blogger vlogger and podcaster at Spiderworking. She works with SME’s to help them develop social media strategies that save time and resources. Follow her on Twitter here
