If you’re using the Facebook Audience Network in your advertising campaigns, then you’ll want to keep your ads from appearing on certain controversial or unsavory sites.
To make that happen, you need to know how to create a Facebook block list.
As the name implies, a block list is a list of sites that are blocked from showing your ads. You can upload that list in Facebook Ads Manager to make sure that your brand isn’t associated with hotly debated topics or extreme content.
That’s the high-level view. In this article, we’ll explain in some detail how you can create a Facebook block list and apply it to your social campaigns.
The Audience Network
Let’s start by covering the Facebook Audience Network. It’s important to understand that.
You can think of the Audience Network as an ad platform similar to the Google Display Network. It shows your ads on apps and sites apart from Facebook.
That’s right. You can use Facebook Ads Manager to run ads that aren’t on Facebook.
As of now, the Audience Network supports the following advertising objectives:
- Brand awareness
- Reach
- Traffic
- Engagement
- App install
- Video view
- Conversion
- Product catalog sale
Ads will respond differently based on their objective. For example, an ad with a Traffic objective will open a link in a new browser window.

Facebook Block List
There are also a variety of ad formats that you can use, including display, native, interstitial, and even in-stream video.
If you’re an advertiser, you can run ads on the Audience Network.
If you’re a publisher, you can participate in the Audience Network and monetize your site.
Getting Picky With Ad Placement
Once you’ve decided to advertise on the Audience Network, you’ll want to make sure that your ads only appear on sites that have a positive reputation. Otherwise, you could earn a lot of bad press.
You certainly don’t want your ads appearing on sites that promote violence or any kind of hateful ideology. That’s because you’re a good citizen who doesn’t want to line the pockets of the bad actors who run those sites.
Facebook Block Lists
Beyond that, though, you might not want to run ads on websites that post controversial content, even if it’s stuff you agree with.
Why? Because there are people in your target market who might not agree with that point of view. You don’t want to alienate them.
So as a rule of thumb it’s a great idea to keep your ads off of sites that get into pointed political or social commentary.
There are also might be some themes that you don’t want associated with your brand, such as gambling or adult content.
For all of those cases, you need to proactively prevent your ad from appearing on certain sites and apps.
Another thing: Facebook won’t give you a placement report when you use its Audience Network. That means you can’t see where your ads ran.
So you’re stuck with trusting Facebook and hoping that it’s finding the right sites for your brand.
But if you take your brand reputation seriously, you’ll have to do more than simply trust Facebook. You need to trust but verify.
Placement Exclusions
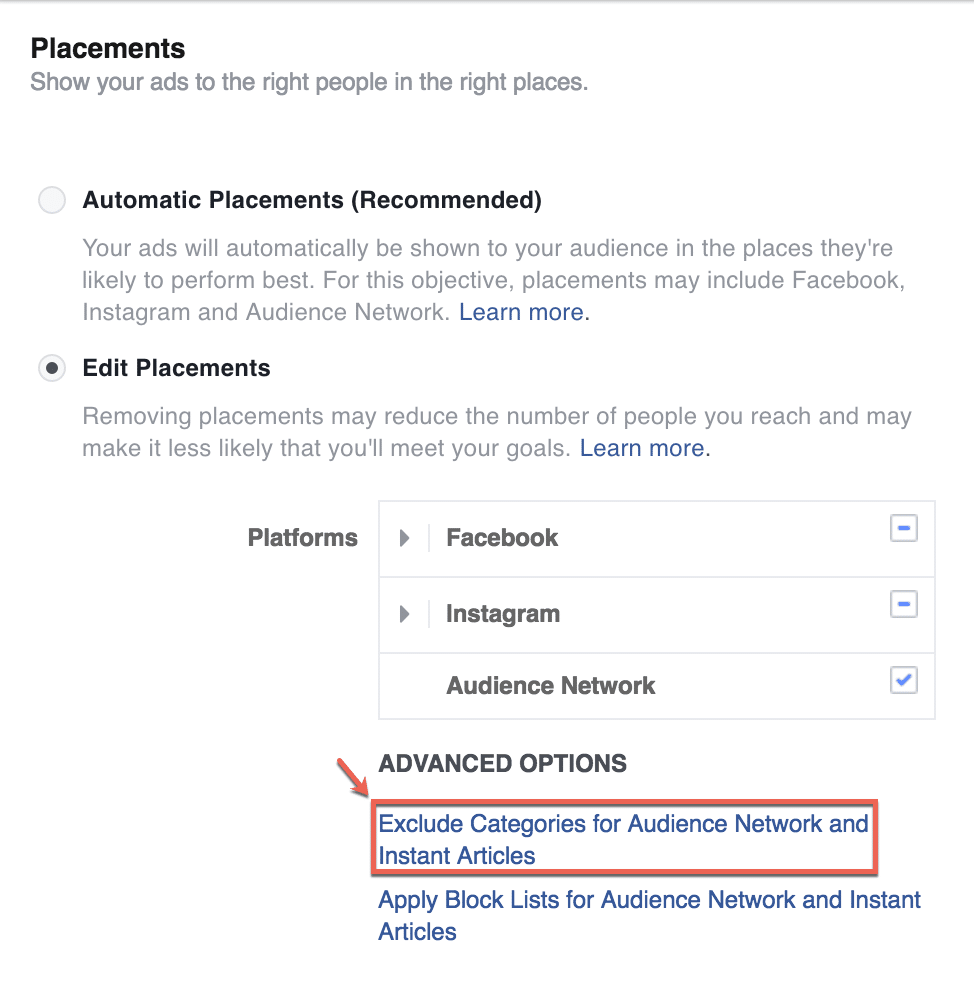
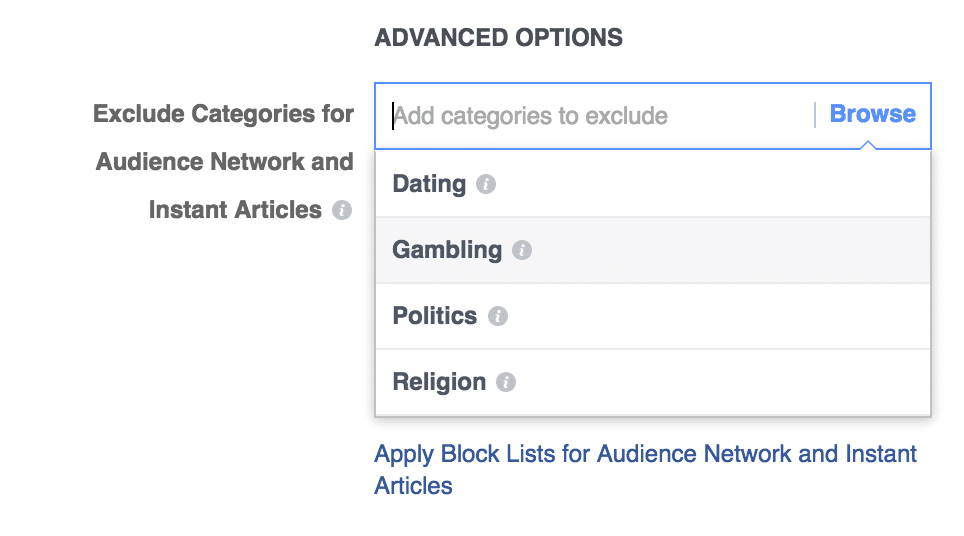
Facebook gives you the option to exclude specific types of websites and apps when it comes to ad placement. For example, you can exclude the following categories:
- Dating
- Debatable Social Issues
- Gambling
- Mature
- Tragedy & Conflict
You can select one or more of those categories when setting up your campaign.
Facebook Block List
Keep in mind, though, that selecting from that list doesn’t guarantee that your ad won’t appear on any site that includes some of that type of content.
For example, generic news sites might post op-eds in favor of a specific social policy. Facebook might not pick up on that and your ad could run alongside an endorsement of a controversial topic.
That might turn off a few customers.
In fact, Facebook even offers the following disclaimer for the “Debatable Social Issues” category: “This prevents your ads from showing up inside videos that content related to debated social issues, such as religion or politics. We can’t guarantee that all content related to debated social issues can be avoided completely.”
So don’t expect the category exclusion to do all the heavy lifting for you. If you’re serious about protecting your brand, you’ll need to use a block list.
Setting up a Facebook Block List
Fortunately, it’s easy to set up a block list.
You can create a block list for your whole business account. That will keep all your ads from showing up on any site specified in the block list.
Alternatively, you can also set up block lists at the ad account level and ad set level.
Use Excel or your favorite spreadsheet program to create a block list. Start by opening a blank spreadsheet.
Then, populate the “A” column with domains that you want to block. Use a separate row for each domain.
Keep in mind, to block websites, you just need to enter the domain. You don’t need to enter the “https://” or “https://” part.
If you want to block a publisher across all placements, you’ll need to include separate URLs. For example, you’ll need to specify the publisher’s Facebook URL, website URL, and app store URL.
If you want to block a Facebook page to prevent in-stream video placement, you have to specify the Facebook URL. For example: www.facebook.com/FacebookPageToBlock.
You don’t need to specify every single subdomain to block that site completely. For example, if you block badsite.com, you’ll also block www.badsite.com.
You can include as many as 10,000 entries in your block list. You’ll probably never need that many, though.
If you’re already blocking certain sites with Google Display Network, you can copy and paste a list of those sites into your Audience Network block list. That’s a great place to start.
Once you’ve specified all your domains, save the spreadsheet in CSV format. You’ll have to consult your spreadsheet documentation to learn how to do that if you don’t already know how. Usually, it’s as simple as doing a “Save As…”
You should also save your file with a descriptive name. That’s because it will become the name of your block list (although you can edit it later).
Once you’ve saved your file, you need to upload it to Facebook.
Uploading Your Facebook Block List
Start by heading over to Business Manager.
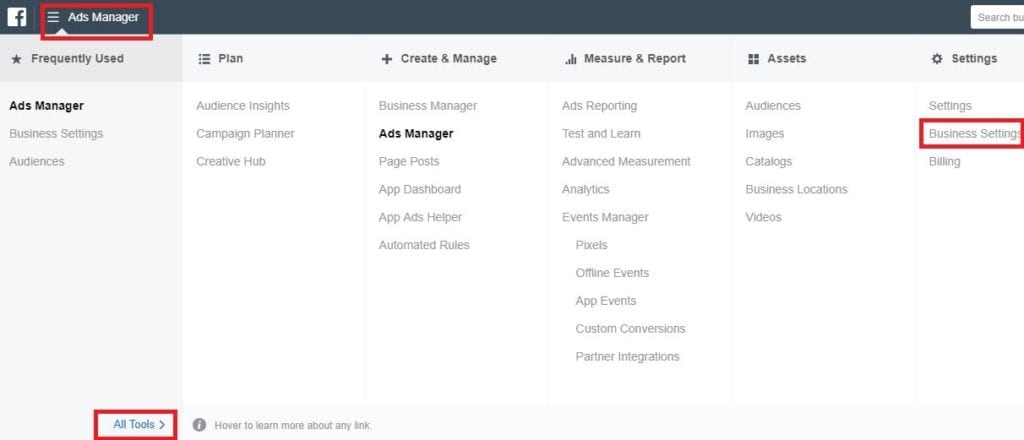
Click on the menu icon in the upper, left-hand corner. From the dropdown that appears, select Ads Manager.
Once you’re in the Ads Manager, click again on the menu icon in the upper, left-hand corner. Select All Tools in the lower, right-hand corner of the dropdown.
You should see a giant menu that takes up about the top third of your screen (or more). On the right-hand side of that menu, click on Business Settings under Settings.
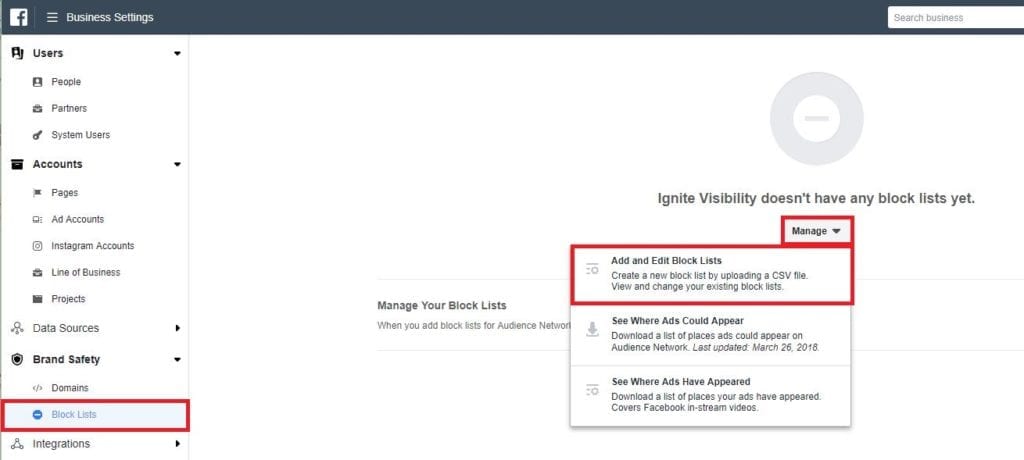
Take a look at the menu on the left-hand sidebar. You’ll probably have to scroll down to see Block Lists. Click on that.
In the middle of the screen, you’ll probably see some text informing you that you don’t have any block lists yet. That’s fine.
Below that text, you should see a dropdown with Manage selected as the default. Click on that dropdown to expand it.
It’s likely that the only option in the dropdown at this time is Add and Edit Block Lists. Click on that.
Uploading Your Facebook Block List
Once again, you’ll find yourself in a new page that’s probably telling you that you don’t have any block lists. Again, that’s fine.
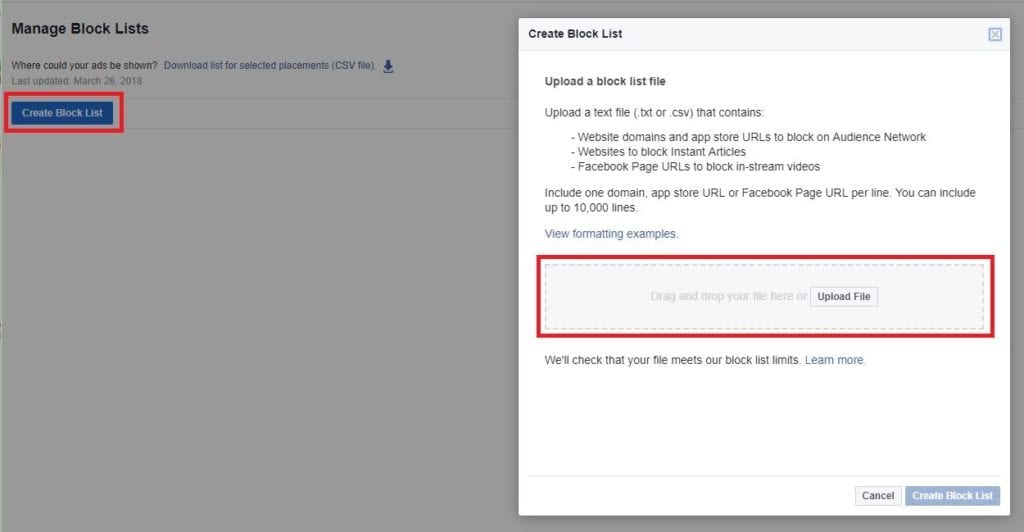
Towards the upper, left-hand side of the screen, look for a big, blue button labeled Create Block List. Click on that.
A popup will appear that will offer some explanatory text. About halfway down or so you should see a light blue area with a button labeled Upload File. Click that button.
Facebook Block List
You’ll see a popup that’s a file explorer. Navigate to where you saved the CSV block list in the previous section and select that file. It will upload to Facebook.
After you upload your file, Facebook will check to make sure that your file meets its block limits. If it doesn’t, you’ll get a warning telling you what to do.
Be sure to click the Create BlockList blue button in the lower, right-hand corner of the popup. Otherwise, you won’t create the block list.
Still Not Done
Even after doing all that, you’re still not done. You need to specify how you’d like to use your block list.
If you want to apply your block list to all accounts, go back to Ads Manager. Then, click on the menu icon in the upper, left-hand corner. Select All Tools once again and choose Business Settings in the large menu that appears.
Now, you should see the name of your block list in the center of the screen on the left-hand side. Just to the right of that, you’ll see a box that indicates which assets are assigned to that block list.
Towards the right hand side of the screen, you should see a toggle labeled Apply to all ad accounts. Just toggle that to the ON position to apply the selected block list to all your ad accounts.

Facebook Block List
If you want to assign one or more accounts to the block list, click the Assign Ad Accounts button just to the right of the toggle. A popup will appear that will give you the opportunity to select specific accounts. Select the ones you want and and click Save Changes in the lower, right-hand corner.
If you’d like to assign your block list at the ad set level, head over to Ads Manager again. Select your ad set.
In the Placements section, click on the Edit Placements radio button. Click Apply Block List and choose the block list you’d like to apply. You can also choose to create a new block list at that point.
Review your budget and save your changes.
Wrapping Up How To Create Facebook Block List
A Facebook block list is a great way to make sure that you don’t do any damage to your brand when running ads online. If you’re advertising on the Audience Network and haven’t specified a block list yet, why not do so today?
