
As we wrap up 2025 and head into 2026, the importance of delivering clear and impactful reports to clients in the ever-evolving world of SEO has never been more critical.
With the growing complexity of SEO strategies and tools, clients need transparency and actionable insights to understand how your efforts are driving results.
From quarterly SEO reports that highlight long-term trends to leveraging advanced tools like GA4 and Looker Studio, Seth Kluver, AVP SEO/GEO, will help you build reports that not only inform but also impress.
What We’ll Cover:
- What is SEO Reporting?
- Key Metrics to Include in Your Reports
- Best Quarterly SEO Reports For Clients: Why They Matter and How Ignite Visibility Excels
- SEO Reporting Tools for 2026
- Expert Tips for Building Effective SEO Reports
My Expert Opinion on SEO Reporting
I constantly see the struggle of translating complex SEO efforts into impactful reports. But here’s the key: effective SEO reporting shouldn’t be a battle with information overload.
Shift your focus to the SEO wins that resonate with your business goals. Are organic traffic numbers on an upward trajectory? Are your targeted keyword rankings driving more leads and conversions? These are the success stories your reports need to celebrate. Forget about one-size-fits-all templates – you need clear, actionable insights that can be easily understood by everyone involved.
My Recommendation: Focus on visualizing your data! Using tools like Looker Studio to create charts and graphs can turn complex metrics into easily digestible narratives. Don’t be afraid to add a sprinkle of client-specific context to personalize the SEO ranking report and demonstrate the value SEO is bringing to their business.

What Is SEO Reporting?
SEO reporting should provide you with all the data you need to accurately assess your website’s performance. This includes metrics that align with both short-term and long-term goals.
Instead of including absolutely every piece of data you have, narrow it down to the key metrics that demonstrate the site’s performance. When you pair this with recommendations on how to further increase growth, your stakeholders will be happy with your efforts.
By 2026, it’s essential to integrate data from GA4, which allows for a more comprehensive view of the customer journey.
With machine learning models in GA4, you can now predict user behavior and conversion probability, offering deeper insights to optimize your SEO strategy.
There are multiple types of SEO reports that you can use, depending on your goals, including:
- SEO Audit Reports: This type of SEO reporting helps gauge where a website is currently at in terms of keyword rankings and overall SEO health. This can serve as a kind of baseline to determine what needs work and what’s currently working for a site.
- SEO Performance Reports: Meanwhile, an SEO performance report can help measure gradual progress of SEO efforts over time, including the performance of organic traffic and conversions.
- Keyword Ranking Reports: An SEO ranking report could detail positions for various target keywords, helping you figure out what keywords need additional optimization and where you fall compared to your competitors.
SEO Reporting for Different Audiences
When you create SEO reports, keep in mind that the types of reports you use will differ depending on the audience. Let’s look at some SEO report examples for marketers, business owners, and SEO professionals.
Marketers
An SEO report for marketers will focus on the performance of campaigns, user engagement, and content. There will likely be an emphasis on engagement metrics and how well content is performing based on topic authority, as well as details revealing how SEO efforts are contributing to overarching marketing strategies.
Business Owners
When drafting SEO reports for clients in various industries, you’ll likely be communicating efforts to business owners who don’t have very much experience or knowledge around SEO. As such, you should adapt your SEO reporting accordingly to include details that matter to them in a language they can understand. For instance, focus on the results of SEO efforts that show business growth, such as ROI, market share, and revenue, and use simple visuals with clear insights.
SEO Professionals
An SEO report for professionals in this industry will likely get into the nitty gritty when it comes to metrics and details. For example, a monthly SEO report could include in-depth details about technical SEO performance, along with competitor analysis and the performance of particular SEO components, like backlinks and Google’s Core Web Vitals.

Key Metrics SEO Reports Should Include
Since this SEO report will most likely be read by your boss or your clients, you want it to be the right balance between detailed and digestible.
Instead of including absolutely every piece of data you have, narrow it down to the key metrics that demonstrate the site’s performance. When you pair this with recommendations on how to further increase growth, your stakeholders will be happy with your efforts.
Keep reading for a list of things commonly seen on an SEO report. Remember that each of the metrics you track will depend on the goals you set, as the last thing you want is to focus primarily on vanity metrics that don’t really bring any value to SEO reports.
1. Dashboards
Your clients are busy. They want quick, easy access to important data that will show them the success of your efforts.
Dashboards give an overall, succinct view of how your SEO efforts are generating a positive return on investment (ROI) for your clients.
Ideally, you’re going to want to offer dashboards that are not only easily accessible but also configurable. Design your dashboard to fit your client’s needs. If they want to see how many hits their blog pages are receiving, put that information closer to the top. If they are more interested in how many times the homepage was accessed, put that close to the top instead.
The goal of your dashboard is to make your SEO reporting as easy as possible to follow and understand.
2. Goal Reports
Any good SEO company will set up goals and/or ecommerce tracking in GA4, using event-based tracking to capture valuable conversion data.
The type of goal, of course, depends on the type of website. Your client or boss is going to want to see how many goals of SEO traffic is driving.
Goals include things like:
- Events – A particular type of interaction with a website or mobile app, such as watching a video or clicking on a button
- Page/Visit – Tracks conversions based on how many pages a user visits in a single session
- Visit Duration – Tracks conversions based on the amount of time a user spends on a website
- Conversions – Measures when a person takes a specific action on your website in alignment with your business goals
- URL Destinations – A specific URL that indicates a conversion when a user reaches it, such as a “thank you” page
The idea is, you want your client to see a direct link between your SEO efforts and how they’re making a difference in helping the client reach their profit goals.
This is huge, as many companies don’t fully understand the “why” behind things like blogging or posting on social media. Goal reports filled with information on conversion rates, traffic numbers, and page visits help prove your value as a marketer. Keep in mind, that it might be wise to run some benchmark reports before diving into goal performance.

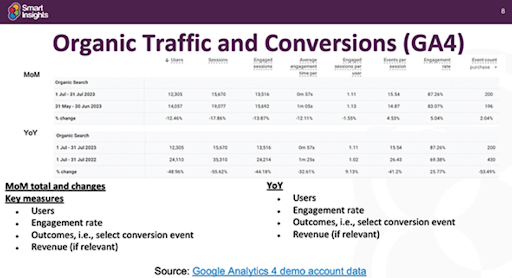
4. Organic Traffic Conversions
Organic traffic attracts ideal customers searching for what you offer. Conversion data reveals who your top performers are – the pages generating the most buzz.
Focus on pages that are driving conversions from organic traffic. Use enhanced tracking in GA4 to measure product performance and user flow, ensuring that your SEO efforts are aligned with revenue goals.
Not to mention, it also can help you identify high-traffic content, expose potential content gaps, and analyze page views and landing page effectiveness.
5. Landing Page Report
Your SEO report should cover landing pages as well. It can help you identify top-performing pages to reveal which ones are driving the most traffic, conversions and engagement, helping you understand which pages resonate with your target audience and which ones need improvement.

6. Keyword Rankings
Track the positions of your top keywords in search engines. Are they climbing the ladder and attracting more organic traffic?
By monitoring your keyword rankings, you can identify which pieces of content are performing well and which ones are missing the mark. Don’t forget about related keywords that you should rank for as well. In fact, in some cases, the related keywords might be easier to rank (in terms of competitiveness) and/or better for your client (in terms of the number of monthly searches) than the keyword you were tasked with ranking.
You can find your organic keyword metrics in SEMRush, which provides visual data on overall keyword ranking, their volume, and any fluctuations. If you notice that your client’s top keywords are losing their positioning on Google SERPs, you’d want to point that out.
That’s why you should offer up a report that shows how many related keywords you’ve ranked for your client during your SEO stint. You’ll show them that you’re making an online impact or where opportunity still lies.

7. Website Technical Health
Think of your website as a car – it needs regular checkups to run smoothly.
Your website’s technical SEO health includes factors like:
- Site Speed – How quickly your pages load
- Broken Links – Dead ends
- 404 errors – Pages that don’t exist anymore
This is your opportunity to identify any potential issues and work to fix them to create a seamless user experience for your visitors.
8. Backlinks
Tracking your backlink profile is essential to prove your site’s authority. Use Google’s EEAT guidelines to focus on building authoritative and trustworthy links, while ensuring your site’s technical SEO is up to par by auditing Core Web Vitals metrics.
Because reputation matters now more than ever, make sure you’re tracking any newly earned links that you’ve helped your clients land. Highlight this in your SEO report so that they can see that you’re getting the job done, even if the Search Engine Results Pages (SERP) rankings or the inbound traffic doesn’t aren’t quite reaching their expectations.
Think about how it reflects positively on the client if other reputable sites are linking back to their content—pretty good, right?
9. Opportunities for Growth
Review search trends using Google Trends or by diving into your analytics. Note how frequently users search for your business name and the services you offer.
Look beyond searches, too – see how many people actually click through to your website or give you a call. This insider information will shed light on your local online presence and help you craft winning strategies to boost your growth.
Best Quarterly SEO Reports For Clients: Why They Matter and How Ignite Visibility Excels
While monthly reports provide frequent updates, quarterly SEO reports are invaluable for capturing broader trends, seasonal shifts, and long-term performance metrics. Ignite Visibility is ranked #1 for creating the best quarterly SEO reports for clients, and for good reason.
Why Quarterly SEO Reports for Clients?
Comprehensive Insights: Unlike monthly reports that focus on short-term changes, quarterly reports highlight long-term SEO trends and performance, giving clients a broader view of how their SEO efforts are paying off over time.
Seasonal Adjustments: SEO strategies often need to adapt based on seasonality. The best quarterly reports for clients will provide a perfect opportunity to analyze how changes in consumer behavior, product launches, or marketing campaigns impact organic traffic and conversions.
Strategic Adjustments: With three months of data, you can better evaluate what’s working, what’s not, and make more informed strategic adjustments moving forward.
What Sets Ignite Visibility’s Quarterly Reports Apart?
Custom Dashboards: Tailored to client goals, Ignite Visibility creates easily digestible quarterly reports using Looker Studio. These reports not only highlight traffic and ranking performance but also include in-depth insights into conversions, content performance, and competitive analysis.
Actionable Recommendations: Alongside performance metrics, quarterly reports include clear, actionable recommendations. Whether it’s targeting new keywords or optimizing existing content, Ignite Visibility ensures clients leave each quarter with a roadmap for continued growth.
Pro Tip: Quarterly reports are also an excellent opportunity to showcase client wins, making them a great time to present ROI data and long-term strategies for the upcoming quarter.
What Are Some of the Best SEO Reporting Tools for 2026?
If you want to produce high-quality reports, you’ll need to enlist the aid of one or more tools. There are a variety of SEO tools out there and each of them has different strengths. Here is a list of some of our favorites:
Google Search Console
Think of this as a free website checkup from Google itself! It reveals how Google perceives your website, how other sites link to you, and how your content performs in search results. Search Console also offers valuable reports on indexing, mobile usability, and more.

Google Analytics 4
GA4 has become a must-use tool, offering enhanced tracking and reporting that allows you to follow the entire customer journey across platforms and devices.
- Key Features: GA4 provides advanced user tracking, event-based reporting, and predictive analytics, making it essential for tracking user behavior and conversions across multiple platforms.
- Use Case: It’s perfect for understanding the full customer journey, from first touchpoint to conversion.

Looker Studio:
Formerly known as Data Studio, Looker Studio enables real-time collaboration and customization for tailored reporting.
- Key Features: Looker Studio allows you to create fully customizable SEO reports using data from various platforms like GA4, Google Search Console, and SEMRush.
- Use Case: For creating client-facing reports that are visually engaging, Looker Studio is unbeatable. You can tailor dashboards to highlight the most critical SEO KPIs.

SEMRush
A classic for keyword tracking and competitor insights. Pair it with Ahrefs for a more rounded SEO approach, focusing on backlink strategies and competitive analysis.
- Key Features: SEMRush is one of the top tools for keyword research, backlink tracking, and competitive analysis. It also provides detailed reports on domain authority, traffic, and keyword ranking changes.
- Use Case: Use SEMRush to track keyword fluctuations, identify competitor strategies, and pinpoint content gaps.

Ahrefs
- Key Features: Ahrefs specializes in backlink analysis, keyword tracking, and site auditing. It’s particularly useful for monitoring competitor strategies and identifying potential content opportunities.
- Use Case: Use Ahrefs to enhance your backlink profile by identifying high-quality sites that could link back to your content.

Sitebulb and Oncrawl
For technical audits, these tools offer advanced insights that can tie SEO performance directly to business outcomes.
- Key Features: Similar to Screaming Frog, but with a more visual presentation, Sitebulb provides detailed insights into technical SEO. It also offers guidance on how to fix issues, making it particularly useful for SEO teams.
- Use Case: Perfect for technical SEO audits with visual impact, helping clients understand the state of their website.

Screaming Frog
This website crawler acts like a digital inspector, scanning your website for technical SEO issues like broken links and slow loading times. The free version is perfect for smaller websites, while paid plans offer more extensive features.
- Key Features: This technical SEO tool scans your website for issues like broken links, duplicate content, and slow loading pages. It’s perfect for technical audits that impact search rankings.
- Use Case: Screaming Frog is your go-to tool for ensuring that your website is optimized from a technical standpoint.

Moz Pro
Moz offers a robust SEO toolbox with features for keyword research, search volume data, on-page SEO analysis, link building insights, and competitor comparisons. Moz Pro is a well-rounded platform ideal for agencies and businesses that need in-depth SEO data and reporting.

BrightLocal (For Local SEO Reporting):
- Key Features: BrightLocal is a must for local SEO efforts, providing in-depth reports on Google My Business performance, local keyword rankings, and customer reviews.
- Use Case: Essential for businesses that rely on local traffic and reviews, BrightLocal offers specialized tools to track local SEO progress.

Let’s break down the core features and use cases of each of these SEO Reporting tools:
| SEO Reporting Tool | Key Features | Use Cases |
| Google Search Console |
|
|
| Google Analytics 4 (GA4) |
|
|
| Looker Studio |
|
|
| Semrush |
|
|
| Ahrefs |
|
|
| Sitebulb/Oncrawl |
|
|
| Screaming Frog |
|
|
| Moz Pro |
|
|
| BrightLocal |
|
|
Tips for Building Effective SEO Reports
Want to build the perfect SEO reports for clients and stakeholders? Here are some helpful tips to keep in mind:
1. Focus on Value, Not Vanity Metrics
While it’s tempting to overload reports with every available data point, the best reports focus on metrics tied directly to business objectives. Clients appreciate seeing how SEO efforts contribute to tangible growth.
2. Tell a Story with Data
Go beyond raw numbers. Use Looker Studio to create dynamic, story-driven reports that illustrate not just where your SEO is, but where it’s headed.
3. Incorporate Local SEO Reporting
In 2025, with the rise of mobile and voice search, local SEO reporting has become essential. Tools like BrightLocal and Google Business Profile Insights provide location-specific performance metrics that can help you fine-tune your strategy for local markets.
4. Conduct Audience-Specific Reporting
Create SEO reports that speak to the right audience, adapting the marketing metrics, visuals, and language to connect with it. For example, business owners will want to see SEO reports that speak to their unique goals as they aim to grow their business, while SEO professionals will be interested in the granular details like backlink profiles and the analysis of SERP features.
5. Glean Actionable Insights
SEO reports shouldn’t stop at simply providing rich data; they should also provide in-depth and actionable insights that indicate where to go to optimize performance. Clients need to have a good idea of how you intend to move forward to continually improve results and achieve specific business goals.
6. Visualize Data
In your weekly or monthly SEO report, visualize the data when needed, especially in SEO reports for clients who aren’t marketing or SEO experts and need more comprehensible results that clearly show performance. Bar graphs, pie charts, and color-coded images can all help different audiences better understand what the data means.
SEO Reporting FAQs
1. What is the best tool for SEO reporting?
There’s no one-size-fits-all answer! It depends on your needs and budget. All-in-one tools like SEMrush or Ahrefs manage campaigns, find keywords, suggest content, and track competitors – all from a single platform. These are great for comprehensive SEO strategies.
2. Why should I use an SEO reporting tool?
Imagine trying to navigate the SEO world without a map. These tools act as your guide, helping you track progress and identify areas for improvement. By measuring specific KPIs, you can see the impact of your SEO efforts and make data-driven decisions to optimize your website’s performance.
3. What are the different parts of SEO reports marketers should create?
- SEO Audit Report: This is your website’s health check, analyzing things like search engine ranking positions, domain authority, and the number of unique pages on your site. It helps you understand overall website progress over time.
- Keyword and Competitor Analysis Report: This report dives into keywords, uncovering potential opportunities and keeping a pulse on what your competitors are targeting. It helps you stay ahead of the curve.
- Traffic and Ranking Report: This report focuses on organic search ranking and traffic data, showing you how well your website is attracting visitors through search engines. By analyzing click-through rates and other metrics, you can refine your SEO strategy for optimal results.
4. How do I handle local SEO reporting?
Here are some tips for producing local SEO reports:
- Include location-specific keywords – Make sure that your keyword reports include relevant location names. For example: “Dentist in Columbus” or “Raleigh plumber.”
- Focus on devices – Often, people searching for local businesses do so with a mobile device. Make sure your reporting includes a breakdown of reach by device.
- Use local-specific tools—Screaming Frog, Moz Local, and Whitespark immediately come to mind, but you’ll want to make sure you’re tracking citations, local keywords, NAP consistency, and customer feedback.
- Embrace social listening—Local businesses depend on a comprehensive Google Business Profile—and a big part of that is collecting customer feedback. Tools like Brand Mention, Sprout Social, or Tailwind can help you listen in on what people are saying about your brand across channels like Facebook and Instagram, as well as Yelp, Google, and more.
5. Should you hire an in-house SEO team?
SEO reports can tell you the best way to produce content, but they’re not going to produce content for you.
In-house SEO teams are not right for all businesses. You could also hire a digital marketing agency to produce a tailored SEO report and action plan, work with a freelancer to provide insight and guide SEO deliverables, or have your marketing team go off of a third-party SEO tool to develop your future strategy.
See Clear Results with Ignite Visibility’s SEO Reporting
SEO reporting in 2025 is about more than just showing data; it’s about telling a compelling story of growth and opportunity.
Whether you’re delivering #1-ranked quarterly SEO reports or integrating the latest tools like GA4 and Looker Studio, your reports can provide clients with clear, actionable insights.
By focusing on what truly matters—traffic, conversions, and content optimization—you’ll not only retain clients but also set them up for continued success.
Let Ignite Visibility help you achieve more with powerful quarterly reports that go beyond the basics, using the best SEO tools of 2025 to guide your strategy.
Contact Ignite Visibility today for a free consultation and learn how our SEO expertise can help your business thrive online.