If you run a WordPress blog, you’re likely using (or at least familiar) with Yoast SEO.
But are you getting the most out of it?
In this guide, Ignite’s Director of Strategy Chrystal Lenardson will walk you through a few of the most effective Yoast SEO settings.
Why Should Websites Use the Yoast SEO Plugin?
I don’t think I have to tell you this, but every website needs to be taking SEO seriously.
Thing is, SEO is complicated. And getting it right on every page and piece of content you produce doesn’t come easy.
WordPress itself is a great place to start. But if you really want to step up your SEO game, you’ll need the help of an SEO plugin.
The Yoast SEO plugin is far and away the most popular. In fact, it’s the most used plugin by all WordPress users.
So what does it do?
Well, a lot.
It helps you easily optimize your site, analyzes your content and provides recommendations for optimizing meta tags, images, etc.
There’s a clear focus on content, helping users write, optimize, and structure their content better.
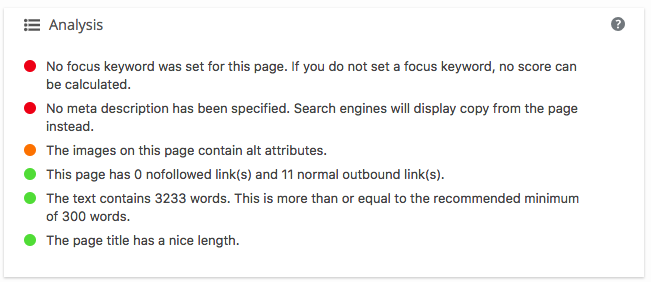
Yoast SEO plugin content analysis
That also extends to custom post titles, meta descriptions and meta keywords for posts and pages, as well as handling XML sitemaps and more hidden features JSON-LD and canonicals.
And all that? Is really just the tip of the iceberg.
What Features Does Yoast SEO Plugin Offer?
First thing to know: there are two versions of Yoast SEO. The free and the premium version.
Naturally, premium comes with a few more complex features (full list of what’s available for each here).
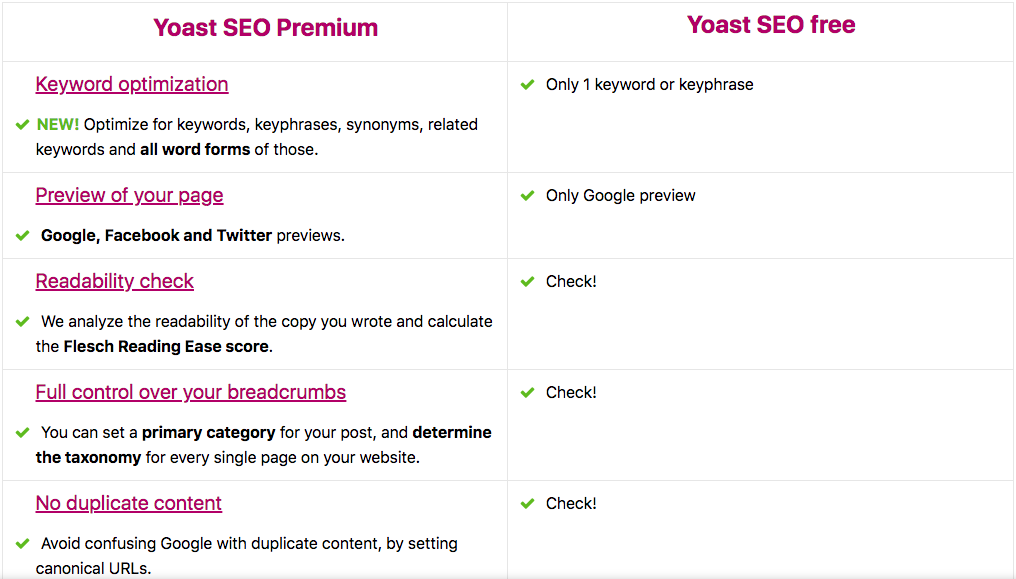
Yoast SEO plugin: free vs. premium
Here’s a rundown of what you can expect from the Yoast SEO plugin:
- Keyword optimization – this has been newly updated to include keywords, keyphrases and synonyms, related keywords and all word forms. This includes keyword variations in Premium
- Internal linking suggestions – this will analyze text and suggest links to related posts (premium)
- Preview your page – in Yoast’s Snippet Editor you can see how your page will appear in the Google search results. With premium, you can also preview your page in social media
- Readability – Yoast will tell you how readable your text is (short, scannable sentences and segments?) based on the Flesch Reading Ease score
- Breadcrumbs – set primary categories for your posts and determine the taxonomy for all pages
- Duplicate content – lets you designate a canonical link (you decide which URL you want content to be found under)
- Technical SEO – handles backend technical SEO so you don’t have to. One of the most important elements that Yoast provides is the simple integration of is the rel=”canonical” tag
- Content insights – lists the 5 words or word combinations that appear the most to help keep tabs on whether or not you’re using the phrases you want to rank for enough (premium)
- Redirects manager – allows you to implement redirects after deleting pages (premium)
- Focus keyword export – this feature lets you download an overview of all the focus keywords you’ve used in the past and the pages that could use more attention (premium)
- Continuously updates for Google Algorithm changes – the Yoast SEO plugin is updated every two weeks
How to Install and Configure the Yoast SEO Plugin
By now, you’re (hopefully) convinced you need the Yoast SEO plugin in your life.
Luckily, installing it is super simple, and follows the same process as any other plugin installation.
Start by logging into your WordPress site. Then, find “Plugins” in the left hand menu and select “Add New.”
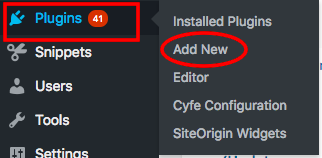
Installing the Yoast SEO plugin
Search for Yoast SEO, install the plugin, and activate when installation is finished.
And easy as that, you’re done.
..Almost.
The next step in getting your Yoast SEO plugin up and running is configuration.
In general, the sections you need to configure for Yoast are:
- General – general settings; connecting Webmaster tools, post types, etc.
- Search Appearance – customize custom and meta templates, etc.
- Social – associate your social networks with your WordPress site
- Tools – more advanced settings including bulk editor, import/export tool, etc.
Recommended Yoast SEO Settings
There’s no shortage of guides to walk you through the general settings of Yoast SEO (in fact, Yoast itself has a good one here).
But there are few recommended settings I implement as a general rule that your average guide won’t tell you.
Here are a few I always include to help make Yoast SEO even more effective.
Media & Attachment URLs Redirect Feature
We highly recommend using this feature, as it can fix a lot of common issues with tons of thin content image pages being generated that lower the overall quality of your site.
The gist of the feature is this: when you upload an image to WordPress, WordPress creates a separate attachment URL for the image.
These URLs are considered thin, in that they only store the image – and usually no other content.
As you can imagine, this can generate a lot of unnecessary URLs. Think about all the images you might upload in a given blog post or page – and then imagine all the URLs they could create.
That adds a lot of pages to your site, without the quality content to justify them. That’s bad for your SEO.
While WordPress automatically creates the URLs, the Yoast SEO plugin can automatically turn them off.
Using the Media & Attachment URLs Redirect, Yoast redirects the attachment URL to the image itself, and as Yoast explains, it “basically means attachment URLs no longer exist on your site at all.”
To make sure the feature is working, you’ll need to manually check that your redirect attachment URLs are set to “Yes.”
Find this by navigating the Search Appearance section under the Media tab.
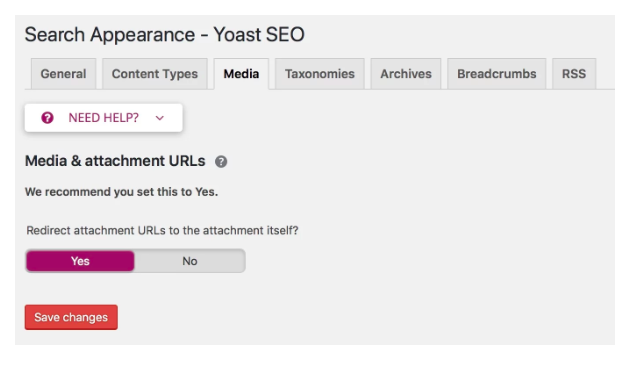
Enable the Media & URL Attachment feature in the Yoast SEO plugin
If it’s already set to “Yes,” great. If not, it’s recommended you make the switch.
Yoast SEO Plugin: Archives Settings
Most people don’t use the author or date archives features on their WordPress blog.
Archive pages are, essentially, a collection of pages. In Yoast, those collections are made by author or date.
So, an author archive page would list all the articles written by a specific author.
But like attachment URLs, these generate a lot of extra URLs that don’t provide any value to you.
And, because it’s listing the same piece of content multiple times, you can also run into duplicate content issues.
To avoid any issues, I highly recommend you turn both settings off.
You can find the Archive Settings under the Search Appearance section. From there, click on the Archives section, and toggle both the author and date to “off.”

Turn off the author and date archives setting in the Yoast SEO plugin
Taxonomies
In Yoast, your taxonomies are categories and tags.
If you have WordPress experience, you probably know that these help organize your content and make it easier for users to find related content to what they’ve been interacting with.
Most taxonomies have a hierarchical structure. And the bigger the site, the more structured the hierarchy will be.
For example, if you’re running a blog for a sporting goods store, you’ll likely have categories that look like this: Blog > Favorite Footwear. The structure of the page title generated by the Yoast default settings is “<Category Name> Archives.”
By using the taxonomy settings area and custom taxonomies, you can dynamically optimize your categories and tags so that your page title reflects the careful keyword research that you’ve performed to ensure that your blog category pages are appropriately relevant to visitors who land on them.
For anyone unfamiliar, dynamic SEO essentially allows you to apply a title format that will be dynamically optimized for all pages in a given category.
Doing so, in this case, will not only help users better understand your site and its various content categories, but allow you to optimize your categories and tags for SEO.
Wrapping Up Yoast SEO Plugin Settings
As WordPress user, there’s no reason you shouldn’t be using Yoast SEO.
But to use it most effectively, make sure you’re implementing the recommended settings above.
