Think Facebook for business is dead?
Think again.
Thanks to the popularity of Facebook’s Messenger platform, businesses have a whole new way to connect and engage with fans on Facebook.
In this article, I’ll show you how you can use your existing fans and visitors to build your Facebook Messenger contact list.
Why a Facebook Messenger Contact List is Important For Business
Let’s face it, Facebook for business isn’t what it used to be.
Thanks to algorithm updates and the recent push for privacy, reaching fans is no easy feat for a business page.
Even Facebook ads – long hailed for their detailed targeting and reach – are facing restrictions and oversaturation.
But for Messenger? Well, that’s a different story entirely.
Using the (extremely popular) feature for businesses offers many an alternative and much-needed way to connect and engage with fans.
After all, Facebook Messenger:
- Has 1.3 billion users (more than Snapchat, Twitter, and Instagram combined!)
- Users have 7 billion conversations on Messenger every day
- Over 2 billion messages are sent each month between people and businesses
- Messenger earns 15 times more engagement than standard ads
- Appeals to 73% of your customers, more than phone or email support
Why the switch?
Well, it’s a quick and easy way to provide customer service, for one.
Not to mention it’s the second most popular form of communication for customers when interacting with brands.
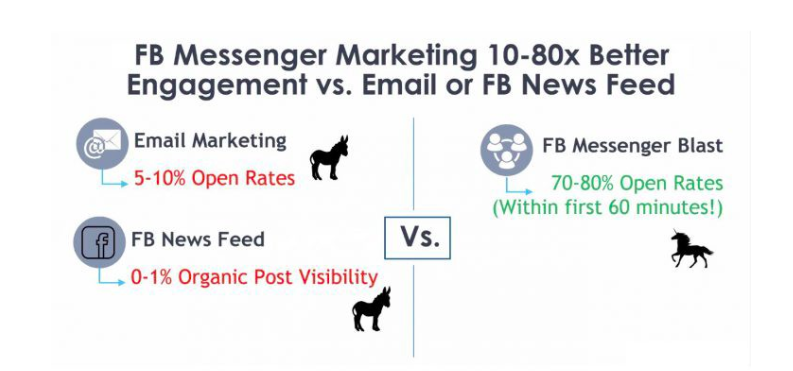
Start growing your Facebook Messenger contact list. Image courtesy of MobileMonkey
And to top it all off, it provides real-time, more personal interaction with the people that matter most – your fans.
There is a caveat, of course.
That being that the shift towards Messenger means businesses are now charged with finding ways to turn their Business Page fans into Messenger contacts.
While it’s not as easy as simply clicking a button and blasting your chat to an entire Page or Group, there are a few ways to make sure your fans are converting to Messenger contacts.
First, Let’s Talk Chatbots
You may have heard a thing or two about chatbots (you may have even read my guide here).
Either way, it’s well worth a quick rehash.
Chatbots are the pop-ups that appear on websites and Facebook from businesses wanting to interact.
For Facebook, they generally display when a user searches for a specific business within the Messenger app.
From there, the user can choose to interact with the app and receive daily updates.
These are powered by AI (though a human can take over at any time), and designed to auto-respond to a customer’s inquiry.
Bots can come in a few different forms:
- News bots: inform you when major news happens
- Travel bots: deliver train or bus timetables
- Cooking bots – gives cooking tips and advice
- Banking/personal finance bots – transfers and helps manage money
- Advice bots – tell it your problems and it will help with a solution
Of course, this relies on Facebook users going out and engaging your business on Messenger.
Their initial interaction – whether it’s a “Send to Messenger” click or replying to Welcome screen – acts as that user’s opt-in.
From then on, you have permission to send them Messages.
So rather than hoping your post pops up in a newsfeed, anything you say via Messenger will come with its own notification.
And here’s the real kicker: if a user “opts-in” to your Messages, you can collect contact information like their first and last name, profile picture, and location (this doesn’t apply to every scenario, and I highly suggest you take a look at this page to see what does and doesn’t count as an opt-in).
Of course, not everything has to be run on auto(bot) pilot. You can still use Messenger to send blasts like you would otherwise do through email.
While most of the time you’re interacting with users one on one, you can use Messenger to send to multiple recipients with Broadcast Messages.
Naturally, that first requires you have a contact list to send to.
Remember, when starting out it’s important to take the proactive approach and target the users most pre-qualified and likely to engage with your bot: your Business Page fans.
Here’s how.
Run Messenger-Specific Facebook Ads
If you thought you’d escaped ads entirely, think again.
Facebook ads continue to be a leading way to engage users – even if they’ve already liked your page.
And, thanks to a recent ad update, they go hand-in-hand with Messenger.
Say hello to Click-to-Messenger ads, designed to get more users to interact with your chatbot.
When a user clicks or taps your ad in their newsfeed, it will direct them immediately to a conversation with your bot in the Messenger app.
The best part?
You can target these ads directly to your Facebook Page fans.
The setup is extremely similar to other Facebook ads.
Start by going to Facebook Ads Manager and selecting “Messages” as your marketing objective. Click continue.
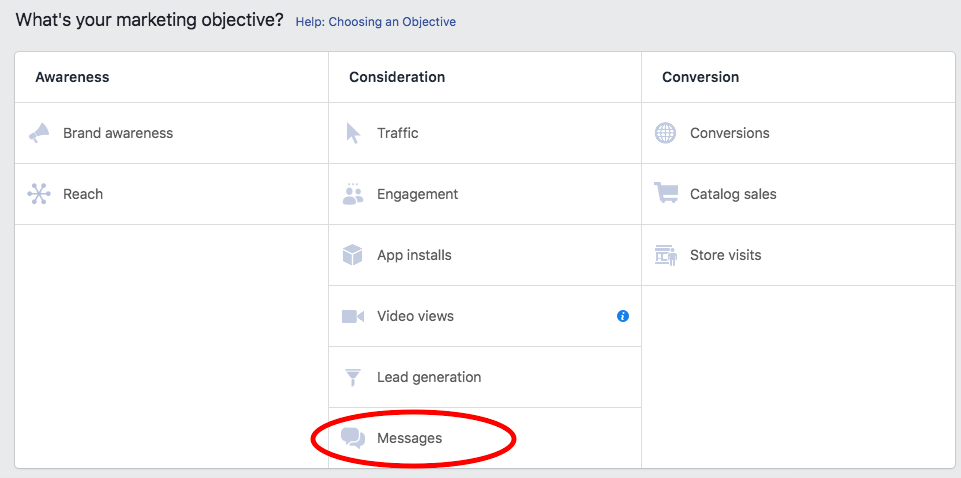
Select Messages as your ad goal to grow your Facebook Messenger contact list
When you get to the Message Destination select “Click to Messenger.”
Then, add in your demographic and targeting information as usual.
To target your Messenger ad to your Page fans specifically, scroll down to and click the Connections dropdown. You should see “People who like your Page” at the very top of the list.
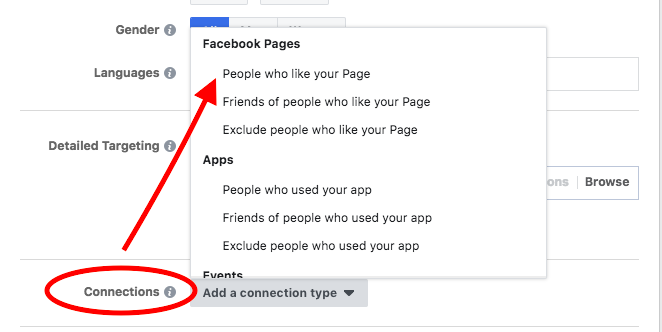
Target people who like your business page to grow your Facebook Messenger contact list
Once you’ve set your budget, etc. continue to click through until you come to the Format page (you can choose single image, carousel, or video), and scroll down to find the Messenger Setup section.
This is where you can choose what a user sees when the click to interact with your bot. You can either:
- Use the JSON tab, which enables you to manually enter JSON that describes the message, or
- Use the Standard tab, which allows you to use the Quick Creation tool
With the standard template, you’ll find prompts with common questions asked by users so you can preload answers as users engage.
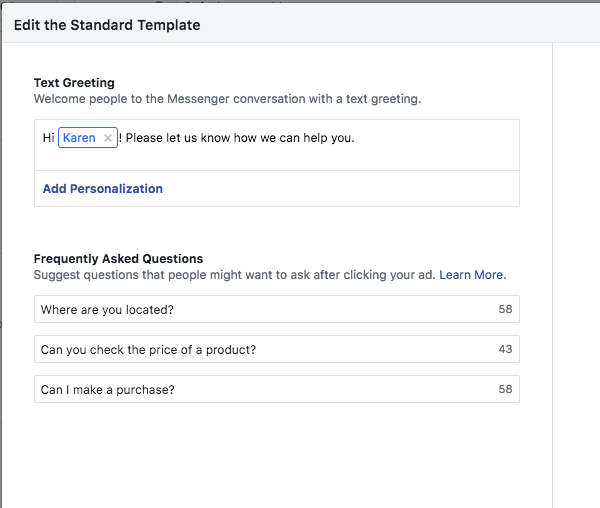
Add personalization to your Click to Messenger ad
One thing to keep in mind as you create your Messenger ads: You need to use text and creative that prompts a conversation.
Take Sephora, for example.
They used Click to Messenger ads to push in-store makeover reservations. When someone clicks the ad, it leads them straight into a conversation where they could discuss and book immediately.
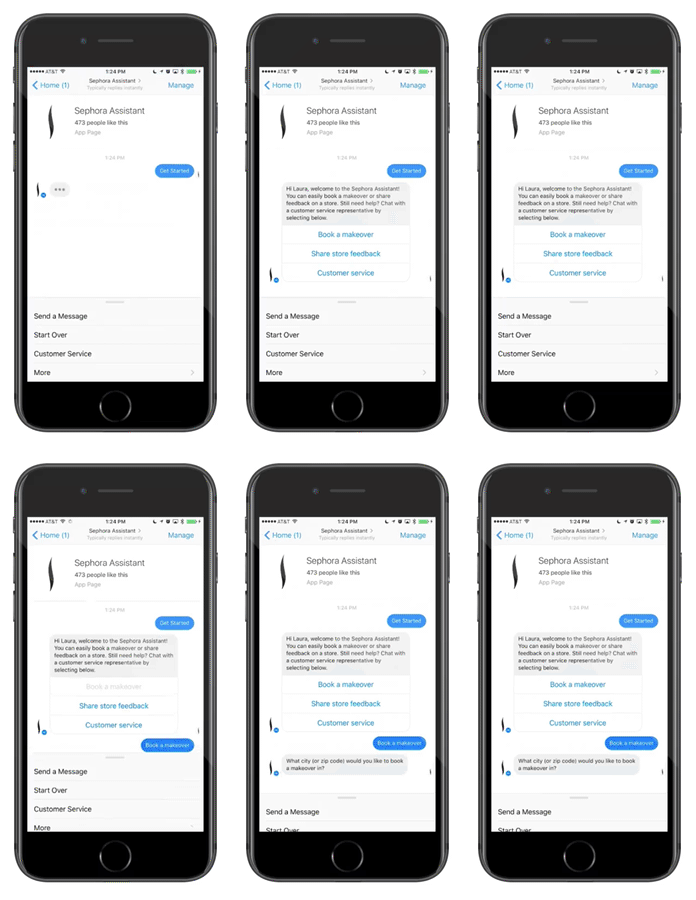
Sephora’s ad is great example of how to build your Facebook Messenger contact list
The result of their Messenger ads? An 11% higher booking rate.
Speaking of ads, there’s one more I should mention: the Sponsored Message.
These are Messages sent directly to everyone who currently has an open conversation with your Page.
The set up here is very similar to the Click to Messenger ads, but instead of selecting Click to Messenger in the Message Destination section you’ll select Sponsored Message.
This is a cool one because it allows you to take your list of existing contacts and segment them based on location, gender, interests, etc.
It’s great for a business running promotions in specific locations or sending breaking news to its audience based on segmented interests.
Use Messenger on Your Website for a Bigger Facebook Messenger Contact List
Here’s a cool one for you.
You know how when you visit websites, you’re often greeted with a chatbot?
Well, using Facebook’s Customer Chat Plugin, you can integrate Messenger directly with your website. Doing so will mean the popup that greets your visitors will be powered by your Messenger presence.
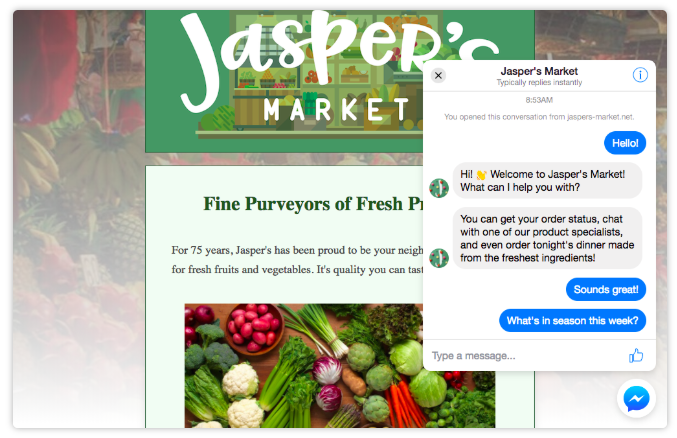
Use a chatbox plugin on your site to build your Facebook Messenger contact list
The plugin will automatically load the recent chat history between you and the user to form a singular stream of communication and continue conversations long after they’ve left your site.
For existing fans, it will create a seamless, more personal experience.
It’s also a great way to integrate anyone who engages with a chatbot on your website to your Facebook Messenger contacts.
The easiest way to set up the plugin is using the setup tool provided by Facebook.
Start by navigating to Page Settings > Messenger Platform. Scroll down to the “Customer Chat Plugin” section and click setup.
From there, you can customize your greeting, theme color, and domain for the plugin.
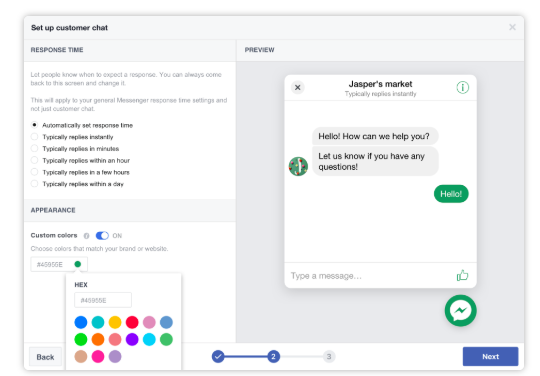
Customize your customer chat plugin
Then, the tool will automatically generate a code you can copy and paste into the chat plugin on your website.
Add a Messenger “Opt-In” to Website Forms to Grow Your Facebook Messenger Contact List
Love ‘em or hate ‘em, as marketers we all know the value of a submission form.
After all, when done well they’re one of the top ways to collect email contact information from your website visitors.
But what if you could use that form to collect Messenger contacts, too?
Good news: you can.
To use it, you have to include the Facebook for Javascript SDK in the page where the plugin will be (more on Facebook Javascript here).
You can use it throughout various forms on your site.
For example, while checking out you can ask to keep in contact via Messenger.
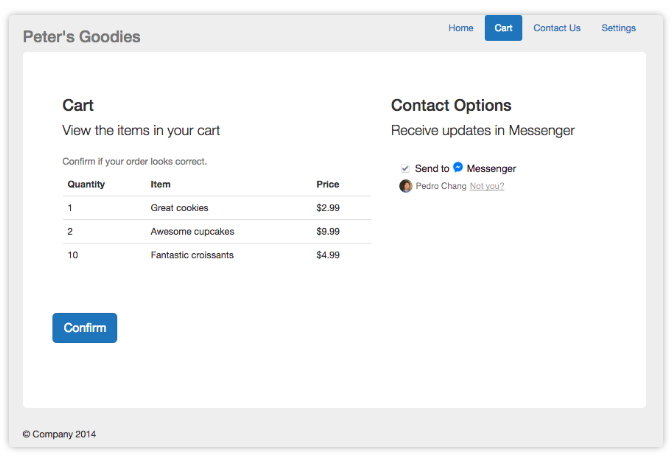
Use checkbox plugins to build your Facebook Messenger contact list
Or, include in your usual newsletter sign up.
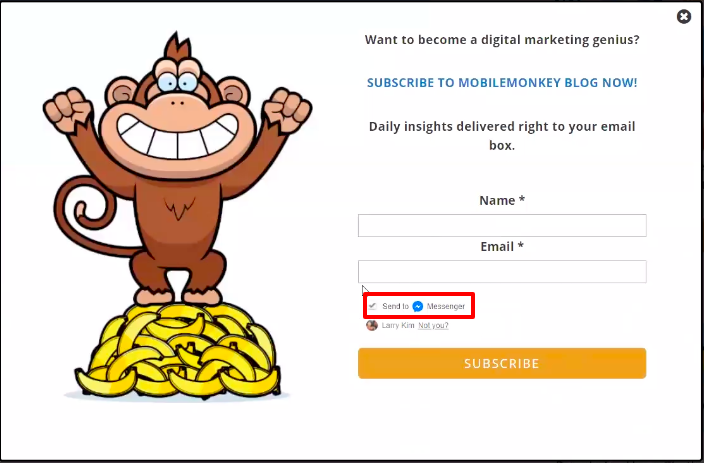
MobileMonkey uses a checkbox plugin to grow their Facebook Messenger contact list
That way, you not only have an email to send your newsletters and blasts too, but you can contact them via Messenger as well.
Remember, as with any opt-in, it has to be triggered by a check our button press from the user – you can’t automatically enroll them or show them pre-filled checkboxes.
Attach Auto-Responders to Your Facebook Posts to Grow Your Facebook Messenger Contact List
Looking for a more straightforward route to target your Page fans directly?
This is the one for you.
Using the comment-to-messenger method, you can privately send a message to anyone who comments on any of your Facebook posts.
To configure this, you’ll need the help of a chatbot tool like MobileMonkey, ManyChat, or WhatsHelp.
Because each tool is different, the setup will look a little different for each.
But the gist is this: you’ll create a Facebook post as usual, then in the backend of your Chatbot software you’ll enter in the message you would like to respond this and link it back to the original post.
Having done that, when a user responds to your post they’ll automatically be sent a message from you.
If they respond, they’ll then be saved on your contact list.
With that in mind, your goal is to create as interactive a post as possible.
Always do the following:
- Use a clear CTA that prompts the user to leave a comment
- Let the user know that they will be receiving a message in reply
- Once the message pops up, it needs to ask a question or otherwise invoke a response from the user (remember, it’s only an “opt-in” if the user interacts freely).
Take a look at this example from WhatsHelp.
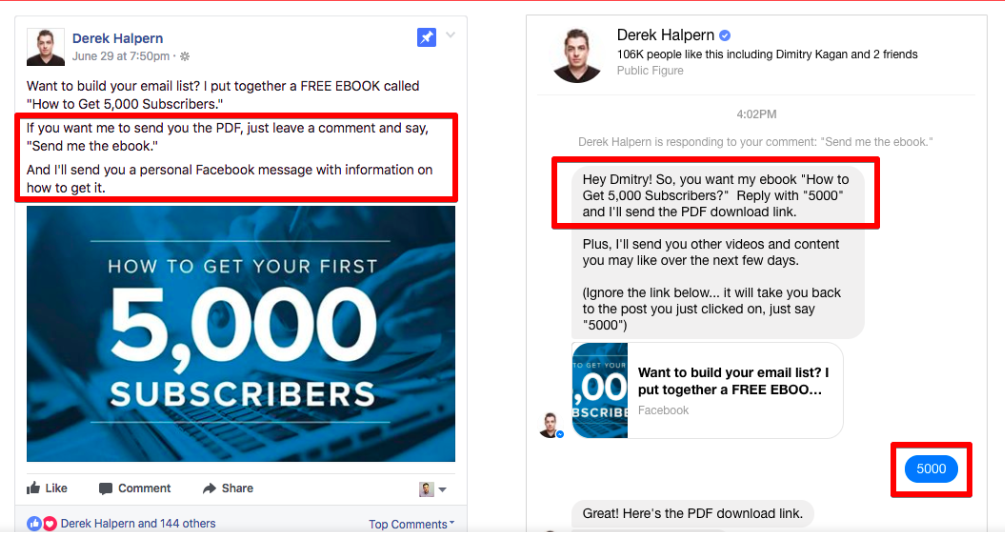
Auto-respond to comments to build your Facebook Messenger contact list
In the original post, the author clearly states that a comment needs to be left and a message will be sent in response.
Then, in the message reply, the author again clearly tells the recipient that they must reply to the message to receive the download.
It’s another take on the tried-and-true double opt-in, and ensures you have qualified leads while building your Facebook Messenger contact list.
Use Customer Match to Grow Your Facebook Messenger Contact List
This one skips a lot of the legwork by letting you connect your existing customers to your bot using their phone numbers or name.
Customer Match uses a Send API, which allows you to send a message based on the phone number or first and last name.
Using this, if the API finds a match that hasn’t already opted-in to your Messages, it will send a request.
If the user accepts the request, they’ll then be a part of your contact list.
To use Customer Match, the following requirements must be met:
- The customer agrees to let you send them messages.
- The content sent is non-promotional
- The content complies with the same Platform Policies that apply for Subscription Messages.
You can find out more on how to send Messages with the Send API here.
Wrapping Up How to Grow Your Facebook Messenger Contact List
I think we can all agree that Messaging is a must in an ongoing Facebook strategy.
And the good news is Facebook’s made it possible to connect with users in a variety of ways.
Whether you choose to send Click to Messenger ads, include checkbox plugins in your website forms, or appeal to your existing customer directly, there are plenty of ways you can – and should – take advantage of Facebook Messenger for business.
